Welcome

I am proud of my family. I love Jesus. I am not perfect. I like junk food, particularly potato chips. I work out with my sexy rock star husband. I hate it. I do it for the company. My children make my heart beat. I was once a full time photographer. I retired to loose my sanity by becoming a stay-at-home Mom. I recently came out of retirement to avoid the looney-bin. Please enjoy the funny stories of my family, the hilarity of me trying to work out & find my skinny and the every-now-and-then crafts that I begin but rarely finish.
God Save The Queen.....
Showing posts with label recipes. Show all posts

Monday, October 5, 2009

Play Dough Cookies

I like to blog surf. It wastes precious time but I'm so addicted. Hello, my name is Lindsey & I sit at the computer jumping from blog to blog when I should be cleaning house, cooking supper or God Forbid, playing with my children.

Wheewww, glad that's off my chest.

Anywhoo, I found this recipe months ago and tucked it into my 'favorites' folder. I was needing something to do in between putting off a load of unfolded clothes and a dirty bathroom, so I went to my little favorites folder and pulled this one out.

I thought the idea was so cute! I tackled this one! And I also have tackled three of these puppies since they've come out of the oven!! There goes my work out plan....

I made the dough a few days ago. It requires you to refrigerate it before working with it.
Kind of a delayed gratification thingy...
Once I was between loads of laundry, I took the dough out today and cut it into my little assembly line...

Then I worked each piece into a ball & put 1 color of each into another bigger ball.
{That sentence didn't make sense at all so just follow in the photos}

Then I rolled that final ball into a 12 inch snake-like strip. Finally coil it up into a pretty little spring.

Definitely remember to grease your pans
Yes, yes, I know....Eight went into the oven...
but only seven made it onto the cooling wrack...The original recipe has such prettier photos.
But I'm sure they taste just as good!!
(p.s. They were really fun to do! Now that I know what to expect with the food coloring, I'm going to do them again with Alexander The Assistant.)

Wednesday, August 26, 2009

Chicken Spaghetti

I'm always looking for recipes with easy ingredients to get together quickly in this fast-paced household of ours. A few years ago a close family friend had Chris & I over for dinner and cooked this dish for us and we loved it.

And the BONUS: it's E-A-S-Y!!! Oh so easy.

{Side note: I also had a different version of this dish a few years earlier when I had Alexander. A special co-worker of mine used her late Grandmother's recipe. It froze GREAT and we had it a few weeks later when the Mom's finished cooking for us. Her recipe called for sliced can mushrooms, pimentos and some other yummy stuff. That dish was so good I asked her for the recipe. When she came to work with it, it was a photo copy of her Gram's cookbook page in her handwriting - So special!! I still have it!)

I made a few changes:
Her recipe was called Ro-Tel Chicken Spaghetti. The Ro-Tel is too pepper-hot to taste with Alexander & the Girls now eating everything we eat. So I put diced stewed tomatoes in ours today.
Hers had green onions - I'm not a big fan of cooking green onions.
Hers had a green bell pepper - I just didn't have one. But it's good either way.

Start with:
2-3 chicken breasts, cooked & diced
1 can Cream of Mushroom
1 can Cream of Chicken
1 can Ro-tel {or diced/stewed tomatoes}
1 lb. Velveeta Cheese
1 onion
2 stalks celery
1lb. pasta {of your choice} Cooked al dente
Sweat the onions & celery in a pat of butter.
Add cans of tomatoes, mushrooms & chickens.
Stir for a while to incorporate.
Dice the Velveeta & add to the pot.
Stir a while to melt the cheese.
Add the diced chicken.
Add the cooked pasta and mix.
Pour into a 13x9 Pyrex
Cook at 350 degrees 30 min. or until heated through.

It's also good to sprinkle parmesan or bread crumbs or chopped parsley on top to finish it off.

I usually use what is in the kitchen.

Wednesday, May 20, 2009

Friday, March 13, 2009

New York Style Crumb Cake

**I have loved Coffee Cake since I was young. But all of the recipes I've looked for lately have included toasted coconut. I can't stand toasted coconut! So one morning when the girls were itty bitty, I was watching America's Test Kitchen and they had a show about breakfast foods and one of the recipes was New York Style Crumb Cake. I tried it in the pan with the parchment paper and all. However, I'm the only one in my house who eats cake, so it went dry really fast. So, this week I tried it in muffin tins so that I can eat one serving at a time. It actually worked! So if you don't plan on the entire cake being eaten with in a day, try the muffin way.

ENJOY!


NEW YORK STYLE CRUMB CAKE
by: AMERICA'S TEST KITCHEN

Don't be tempted to substitute all-purpose flour for the cake flour, as doing so will make a dry, tough cake. If you can't find buttermilk, you can substitute an equal amount of plain, low-fat yogurt. When topping the cake, take care to not push the crumbs into the batter. This recipe can be easily doubled and baked in a 13 by 9-inch baking dish. If doubling, increase the baking time to about 45 minutes. Cooled leftovers can be wrapped in plastic wrap and stored at room temperature for up to 2 days.Serves 8 to 10

Crumb Topping
1/3 cup granulated sugar (2 2/3 ounces)
1/3 cup dark brown sugar (2 2/3 ounces)
3/4 teaspoon ground cinnamon
1/8 teaspoon table salt
8 tablespoons unsalted butter (1 stick), melted and still warm
1 3/4 cups cake flour (7 ounces)


Cake
1 1/4 cups cake flour (5 ounces)
1/2 cup granulated sugar (3 1/2 ounces)
1/4 teaspoon baking soda
1/4 teaspoon table salt
6 tablespoons unsalted butter (3/4 stick), cut into 6 pieces, softened but still cool
1 large egg
1 large egg yolk
1 teaspoon vanilla extract
1/3 cup buttermilk
Confectioners' sugar for dusting


1. FOR THE TOPPING: Whisk sugars, cinnamon, salt, and butter in medium bowl to combine. Add flour and stir with rubber spatula or wooden spoon until mixture resembles thick, cohesive dough; set aside to cool to room temperature, 10 to 15 minutes.
2. FOR THE CAKE: Adjust oven rack to upper-middle position and heat oven to 325 degrees. Cut 16-inch length parchment paper or aluminum foil and fold lengthwise to 7-inch width. Spray 8-inch square baking dish with nonstick cooking spray and fit parchment into dish, pushing it into corners and up sides; allow excess to overhang edges of dish.
3. In bowl of standing mixer fitted with paddle attachment, mix flour, sugar, baking soda, and salt on low speed to combine. With mixer running at low speed, add butter one piece at a time; continue beating until mixture resembles moist crumbs, with no visible butter chunks remaining, 1 to 2 minutes. Add egg, yolk, vanilla, and buttermilk; beat on medium-high speed until light and fluffy, about 1 minute, scraping once if necessary.
4. Transfer batter to baking pan; using rubber spatula, spread batter into even layer. Following photos below, break apart crumb topping into large pea-sized pieces and spread in even layer over batter, beginning with edges and then working toward center.


Bake until crumbs are golden and wooden skewer inserted into center of cake comes out clean, 35 to 40 minutes. Cool on wire rack at least 30 minutes. Remove cake from pan by lifting parchment overhang. Dust with confectioners' sugar just before serving.


Wednesday, March 11, 2009

Brother's Birthday Cupcakes


My Gram used to traditionally make a Red Velvet Cake for my birthday. It had become a comfortable tradition that I would look forward to every year. That slice of red goodness topped with lucious cream cheese frosting was enough to send a diabetic into a coma. The cake was always so soft she had to keep the layers held together with tooth picks - I'd look forward to finding one. Kind of like finding the baby in a King Cake. HEY, it was a tradition, okay!!
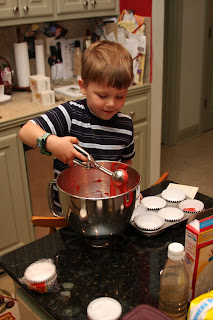
I adore baking. I think that was passed down from Gram and Mom. My Girls don't have a chance especially since my Mother-In-Law is Betty Crocker. (No lie, she's a diva in the kitchen, too!!!) I've been on a baking tear lately because Alexander has become really interested in helping me. However, I haven't really wanted to try my hand at Red Velvet until this year. It's not a difficult recipe, just not my tradition.
Until now.
I thought this would become something nice for me to pick up for the Patties in memory of Gram. Brother jumped in with both hands. I think the food coloring was the "icing on the cake!!"

Here's the recipe:

RED VELVET CAKE

1 box White Cake Mix
3 Tbsp Cocoa
1 Tsp Baking Powder
2 mini bottles of RED food coloring
**Put the food coloring in the water that the cake mix calls for.
**Continue on with the directions on cake mix.

CREAM CHEESE ICING
1 8oz. Cream Cheese (room temp.)
1 stick unsalted Butter (room temp.)
1 lb. powdered sugar
1 Tsp Vanilla
**Mix all together and spread over cake